Tuesday, April 10, 2012

Women's Shirt into a Child's Dress

I found an old shirt of mine and made it into a dress for my daughter.  Sorry the pictures are so blurry.  I took the first few with my phone because my daughter was sleeping at the time and my camera was in the room she was in.

I started with this....


Cut out the pieces of the shirt you would like to use..


Cut out 12 pieces of long strips and braid them together so you have 4 strips.


Sew the two pieces together.


Pin the straps in place.

This is the front..


This is what the back looks like.


Tada!!!!


Turning a Purse into Toddler Shoes

I went to the dollar thrift store and picked up this purse for only $1... figured I could do something with it!


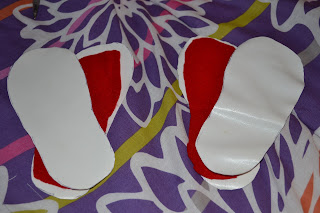
The first thing I did was traced a pair of my little girl's shoes!  I doubled up on the fabric using two pieces for eat shoe.


Next, I used a piece of felt to provide some padding and I put it in the middle between both of the pieces of fake leather.


Next, I formed the bow.  Pinching it accordion style works great!  Be sure to sew it into place so you don't lose the form.


Then, I made the straps for the back of the shoe so my daughter's foot doesn't slide.  I used a few long pieces of fake leather from the purse and a piece of elastic so the band could stretch.


Sew the bow onto the piece of fabric.


Sew the pieces and elastic bands in place on the shoes.

Friday, March 30, 2012

Using a Men's Shirt to Make a Toddler Dress

I started out with this shirt.  Since men's button down dress shirts are most common, this is what I mentioned in my title.  However, the shirt I used is actually a women's dress shirt.  I found it at the thrift store for only $1.  I loved the colors and bought it to see what I could make of it.


The first thing I did was cut off the sleeves and the collar.  The picture of doing this is pictured below.  Next, I cut the dress into the shape of a dress by making it smaller at the top and wider on the bottom.  After that I flipped the two layers right side in and sewed both sides.


Turn the dress right side out and flip the edges on the top inward.  Be sure the edges are wide enough to fit a piece of elastic through.  Sew the edges, but leaves about a one inch gap to thread the elastic through.  After the elastic is through, you can sew it shut.


You can now cut out the straps using your sleeves.  Measure out your child so you know how long to make them.


Sew them on the inside of the dress and tada!!! Your dress is done.  If you want, you can add a flower to spice it up.  Make your own design with the leftover fabric.


So pretty and unique!

Turn an Old Shirt Into a Toddler Dress

Read below to see how I turned an old shirt I got from a thrift store for $1 into a beautiful sundress for my little girl.  The fabric was a stretchable fabric, which worked great!  Notice I picked out a shirt with some "spice" to it.  My daughter loves the little gemstones!


The first thing I did was cut off the sleeves and angled the shirt into a dress by making it skinnier at the top and wider towards the bottom.


Next, flip the two patterns so they are right side in and sew the sides together.  Be sure to leave the top and the bottom open to get her head through.  :)


After that you will want to cut 6 strips of fabric and sew the ends together.  Make the fabric pieces about one inch wide and about a foot long.  Braid them all together and sew the other end as well to secure it tight.


Turn the dress right sides out and sew the straps in the inside.  It is helpful to measure on your daughter first.  If possible pin them in place.


I ended up taking the straps off and adding some white in there for something different :)


ISN'T SHE PRETTY!!


Wednesday, February 22, 2012

Making Toddler Fleece Slippers


The first thing you want to do is cut the sole of your toddler's slip.  To do this you will want to measure his or her foot and add an extra inch in width and length.  Cut two pieces for each foot.

Also,  cut the letter "G" out so the length is equal to the sole of the slipper.  You will need two pieces of this for each foot as well.

Next, pin the two pieces together.


Sew all the way around the sole of the slipper for each foot.  The reason you want two pieces of fabric is to provide extra comfort and cushion for your toddler.


You can also sew along the outer edges of the "G" as well, leaving about an inch gap as space.  With this space you will want to turn the fabric inside out and sew the rest shut.


Position the fabric as shown below and apply velcro to them.  Sew the sole and the letter "G" together to make a slipper.


Here they are on my little girl!!

Wednesday, February 8, 2012

Sewing a Simple Cloth Headband

You can make a cute cloth headband for yourself, child or a friend with just a few materials.
You will need:
Fabric
Elastic
Scissors
Ruler
Marking Pencil
Sewing Machine

Start by measuring two pieces of fabric.  I cut my headband 15" x 3" but you can choose the thickness or thinness you wish to have.  You will also need another piece of fabric.  Cut this piece about 12" x 3".  These measurements are for a toddler's head. Make these measurements larger if you are making it for yourself.


After you have marked the fabric to the sizes you want, cut them out and lay them flat.


Fold the inner edges around your big piece of fabric and pin both sides on your larger piece of fabric.  With your smaller piece fold it in half lengthwise and pin it tight.  Sew the seams shut and make sure you take out all of the pins.


Turn the smaller piece right side out and slip the piece of elastic through.


Sew the end of the piece of fabric where the elastic ends.  It will look scrunched up like the piece below.


Next, fold both sides of your larger piece like pictured below.  Be sure to sew it so it is secured.  Don't worry if it looks messy, you won't be able to see this part..


Slip the elastic piece of fabric under the larger piece and sew shut.  Repeat on the other side as well.


Tada! Here is your new headband!


So cute!!! :) 


Monday, February 6, 2012

Making a Toddler Dress out a Shirt

Do you have old button shirts laying around?  Either flannel, cotton or any other material will work great in using these old shirts to make a dress for your little toddler...

First...find a shirt!


Next, cut off the arms and collar of the shirt..(my daughter threw in a drumstick in on the picture. haha. You can see her on the left side.)


Fold your shirt in half with the button on the inside of the dress.


Now, cut the "dress" which is still a shirt into a dress shape.  Make it smaller on the top and wider on the bottom as show below.


Now, open up the dress and lay the side with the buttons facing up and the other piece of the shirt right on top of it so both good pieces are facing each other.  Sew the two ends together.


Now you can use the sleeves that you cut off your shirt to make the straps.  Cut two triangle shapes like the first triangle in the next picture.  The 2nd triangle in the next picture is what it is going to look like when it's opened up.


Sew the two straps on inside out.  When you are done turn the dress to the right side.  The button part of the dress will be facing the back.


Tada!! A beautiful pink dress for my little girl!  The dress isn't perfect, but it is sewn with love!